Dragonflight Season 4 is coming, introducing new M+ instances to players. The Nokhud Offensive, which is in Ohn’ahran Plains, will be one of the new-old M+ dungeons to explore. In the dungeon, you can choose which boss you want to defeat first, except for the final boss, Balakar Khan. You can also ride a dragon to get from one boss to the next one. Only this M+ dungeon has this one-of-a-kind feature that was added in Dragonflight.
Since this dungeon doesn’t have any checkpoints, you will be sent back to the beginning if you die, which is a huge waste of time. To prevent this from happening, we recommend ordering the mythic boost service, where experienced players will help you complete this dungeon with zero wipes. Apart from that, our boss guide will help you get ready for encountering them.
Granyth: Tips and Strategy
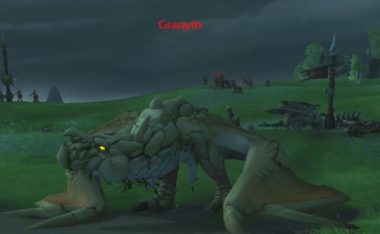
The boss will periodically cast Shards of Stone, which deal inescapable damage to all players unless you stay more than 60 yards away. Granyth will cast Tectonic Stomp many times throughout the encounter. Run away and avoid getting attacked; you may lose uptime DPS on the boss if you are a melee player, but it is worthwhile. Immunization is also effective. When the boss has reached 100 energy, he will cast Eruption and start its “phase.”
Here is the hard part: the boss will “activate” one of the Dragonkiller Lances two seconds before the Eruption is unleashed, which is the only method to halt the Eruption before it wipes out your team due to its “enrage” effect. Here are a few crucial things to know:
- Dragonkiller Lance may be found in three separate locations.
- A few seconds before the Eruption is launched, the boss randomly ignites one of the three Dragonkiller Lances.
- Because you can’t shoot the Dragonkiller Lances until the boss activates them, you should always have someone ready to “click” on the lance.
- It is the only method to halt the Eruption before it decimates your crew.
- It stuns the boss for 5 seconds and drains 5% of his health.
On Mythic difficulty, you must additionally encounter Nokhud Saboteur. It is critical to stop them at all means before they spell Dismantle, which will prevent you from utilizing Dragonkiller Lance and eventually wipe out your crew. They are affected by the effects stun, root, immobilize, slow, and disturb. For optimal effectiveness, you should cleave them all with the boss.
The Raging Tempest: Tips and Strategy
The boss’s energy bar was previously set at 50. It takes around 30 seconds for him to start his “phase” of Electrical Storm, which will be simpler to deal with if you employ your personal defenses in conjunction with your healer’s cooldown. Keep in mind that after the phase is completed, it is washed and repeated: Recharge Energy – > Cast his skills – > Phase Again. Here are a few crucial things to consider before beginning this phase:
- The boss will occasionally use Energy Surge. This is a high tank-threat ability that buffs The Raging Tempest. The good news is that you can dispel it.
- Every person in your group will occasionally receive Lightning Strike. It’s crucial to spread apart so you don’t “clip” one other accidentally. It will cause you harm after it has expired.
Lightning Strike causes Electrical Overload on Mythic difficulty, destroying any Lighting Orbs it strikes. Either gather them or avoid hitting them.
Teera and Maruuk: Tips and Strategy
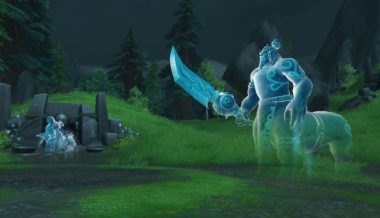
It’s important to note that the two legendary centaurs share health through Life Link. This means that the best plan is to always tank them together so that the DPS can “cleave” them. They will have energy, just like all the other bosses so far. Teera starts at 50 and Maruuk starts at 0. They will use their signature moves, Teera’s Gale Arrow and Maruuk’s Earthsplitter when they hit 100 energy. Here are some other tricks to beat the boss:
- When Teera casts Spirit Leap, move quickly to her to keep cutting both bosses for as long as possible. Teera will use Quick Shot the whole time the fight is going on. Make sure your health is above half to stop any damage that could kill you. Brutalize is a “tank-buster” skill that is very powerful. As a tank, you need to have mitigation up. If you don’t, ask a healer for an external defensive delay to help you out.
- When Teera uses Repel, watch out because you will be pushed back. Because the follow-up Guardian Wind can be interrupted, classes that can close gaps will be useful here.
- Last but not least, Maruuk’s Earthsplitter is a deadly move that you must always avoid. You have two seconds to stay out of its way. If you can’t, know that the hurt is physical, so any defenses you have will help you stay alive.
On the Mythic level, every second that they are more than 20 yards apart, an Ancestral Bond feature will make their damage go up by 5%. To avoid making an already tough fight even harder, you want to keep them together at all times.
Balakar Khan: Tips and Strategy
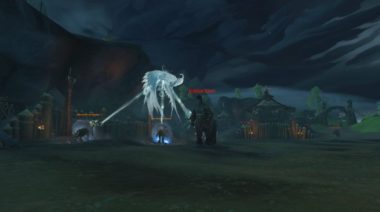
Balakar Khan is a two-phase boss fight with a lot of tricky rules that will put your party to the test. During Phase 1, the boss will sometimes cast Iron Spear on a random member of your group. This is followed by an instant charge to “collect” his spear, called Iron Stampede. Stay close to a wall to “bait” the charge and keep the boss from getting too far away. The last thing you should do is avoid the Upheaval ability at all costs because it will severely damage your health.
The boss will start his Intermission when his health drops to 60%. Phase 2 will start as soon as you beat the 4 Nokhud Stormcaster. During Phase 2, Balakar Khan will use a Conductive Strike on the tank from time to time. The Healer needs to be careful and Dispel right away. The DoT and Thunder Strike will both do damage to the tank every second. The boss will use the Static Spear on a single player during this phase. When hit, it will bring everyone in the party to where it is. You don’t have much time to move away from it before the Iron Stampede hits you. Like in Phase 1, you should play close to a wall to bait the charge and lessen its straight dash. On Mythic level, the boss will cast Quake every time Upheaval is over. This will leave a damage-dealing area of effect on the ground that you should try to avoid.
Conclusion
Mastering the bosses in the Nokhud Offensive dungeon requires strategic coordination and precise execution. Utilizing the unique mechanics of each encounter, such as Dragonkiller Lances and Life Link, alongside effective positioning and timing, is essential for success. Collaborative teamwork and adaptability are paramount, especially on Mythic difficulty.
Article written by Chloe Boone